> ## Documentation Index
> Fetch the complete documentation index at: https://yuno-3979e326-docs-agent-readable-descriptions.mintlify.site/llms.txt
> Use this file to discover all available pages before exploring further.
# Prerequisites (Apple Pay)
> Register a merchant identifier, certificates, and Dashboard connection before integrating Apple Pay.
Apple Pay supports third-party browsers such as Google Chrome for users with iOS 18 or higher.
Use this guide to prepare and configure Apple Pay with Yuno.
* [**Apple Developer prerequisites**](#step-1-register-a-merchant-identifier): Create a merchant ID, generate and convert the required certificates/keys, and verify your merchant domains.
* [**Yuno Dashboard setup**](#step-11-apple-pay-dashboard-connection): Add the Apple Pay connection, set up routing, and enable Apple Pay in Checkout Builder.
When finished, you'll be ready to [choose your integration path](#next-steps) (SDK or Direct) for one-time and recurring payments.
## Step 1: Register a merchant identifier
If you're using VTEX as your e-commerce platform, you'll need to configure your Apple Pay Merchant ID. For detailed instructions, check out the [official VTEX documentation](https://developers.vtex.com/docs/guides/setting-up-merchant-id-in-apple-pay).
In the Apple Developer dashboard:
1. Log in to [Apple Developer](https://idmsa.apple.com/IDMSWebAuth/signin?appIdKey=891bd3417a7776362562d2197f89480a8547b108fd934911bcbea0110d07f757\&path=%2Faccount%2F\&rv=1), go to **Certificates, Identifiers & Profiles**, then select **Register a new identifier**.
2. Choose **Merchant IDs**.
3. Enter a **Description** (e.g., `Apple Pay Integration`) and an **Identifier** in the format `merchant.com.y.uno.YourBusinessName`.
## Step 2: Generate a payment processing certificate
1. Create a new directory (e.g., `Downloads/ApplePayFiles`) to store the certificate files.
2. Open **Keychain Access** on your Mac.
3. Go to **Keychain Access > Certificate Assistant > Request a Certificate From a Certificate Authority**.
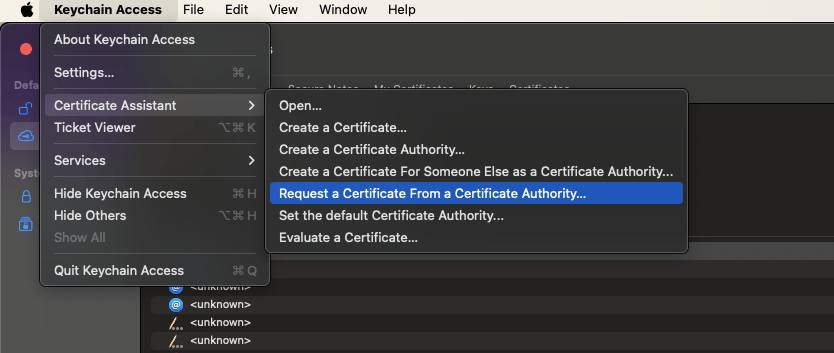 4. Fill out the form:
* **Email Address**: your email address
* **Common Name**: a name for the certificate (e.g., `John Doe ProcessingCertificate`)
* **CA Email Address**: leave blank
* Select **Saved to disk**
* Check **Let me specify key pair information**
5. Click **Continue**, then save the file as `CertificateSigningRequestPaymentProcessingCertificate.certSigningRequest` in your working directory.
6. When prompted for key pair settings, use:
* **Key Type**: Elliptic Curve (EC)
* **Key Size**: 256-bit
* **Algorithm**: ECDSA
## Step 3: Retrieve and convert the payment processing certificate
1. Go to the [Apple Developer Merchant ID list](https://developer.apple.com/account/resources/identifiers/list/merchant).
2. Select your Merchant ID and click **Create Certificate** under **Apple Pay Payment Processing Certificate**.
3. When prompted, answer **No** to "Will payments... be processed exclusively in China mainland?"
4. Upload the file `CertificateSigningRequestPaymentProcessingCertificate.certSigningRequest`.
5. Download the signed certificate as `apple_pay.cer` and save it to your directory.
6. Convert the certificate to PEM format:
```bash theme={null}
openssl x509 -inform DER -in apple_pay.cer -out apple_pay.pem
```
## Step 4: Export the private key
1. In **Keychain Access**, find the key you created (e.g., `John Doe ProcessingCertificate`).
2. Right-click and choose **Export**.
3. Export the key as a `.p12` file (e.g., `JohnDoeProcessingCertificate.p12`) and save it to your working directory.
4. Set a strong password (you’ll use it in the next step).
5. Convert the `.p12` to a PEM-format private key:
```bash theme={null}
openssl pkcs12 -in JohnDoeProcessingCertificate.p12 -nocerts -nodes | sed -ne '/-BEGIN PRIVATE KEY-/,/-END PRIVATE KEY-/p' > ProcessingCertificatePrivateKey.pem
```
The private key will be stored in `ProcessingCertificatePrivateKey.pem`.
## Step 5: Upload the certificate and key to Yuno
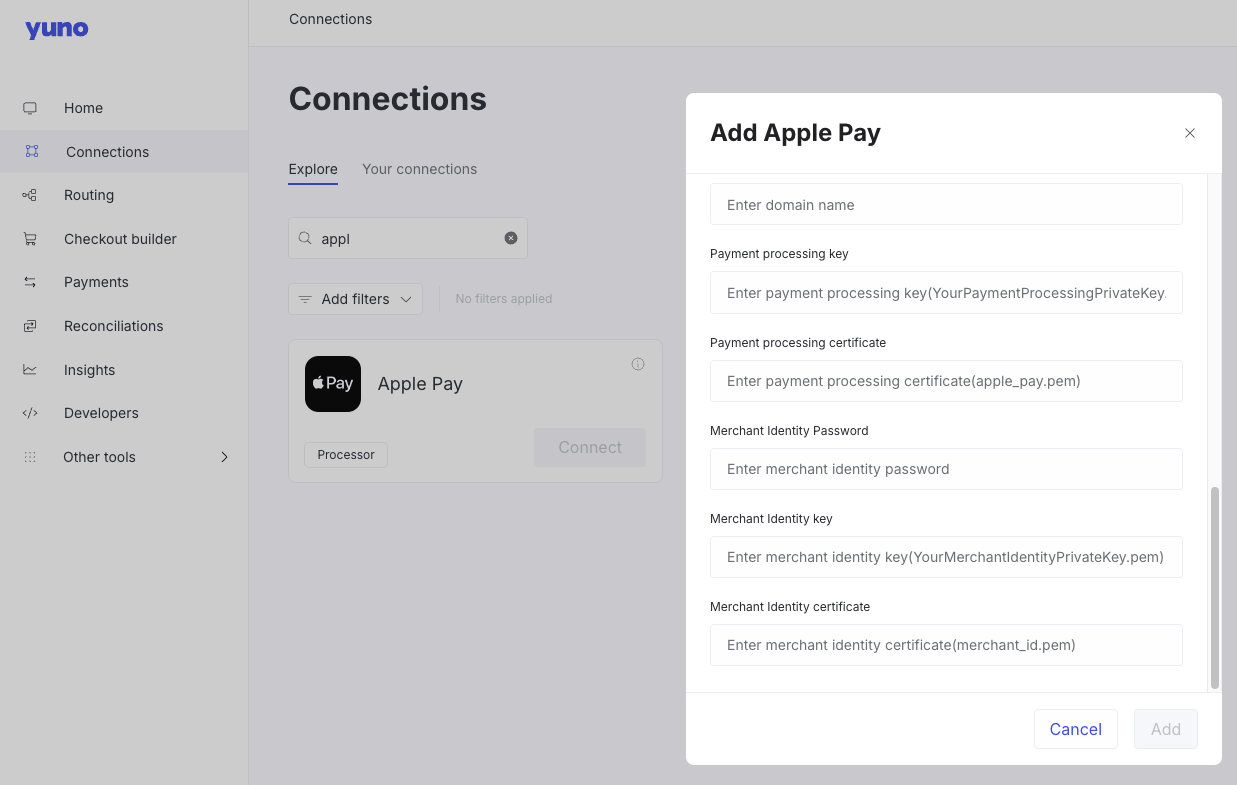
1. Open the [Yuno Dashboard](https://auth.y.uno/u/login) **> Connections > Apple Pay > Connect**
2. Enter the contents of `ProcessingCertificatePrivateKey.pem` to the **Payment processing key** field.
3. Enter the contents of `apple_pay.pem` into the **Payment processing certificate** field.
4. Fill out the form:
* **Email Address**: your email address
* **Common Name**: a name for the certificate (e.g., `John Doe ProcessingCertificate`)
* **CA Email Address**: leave blank
* Select **Saved to disk**
* Check **Let me specify key pair information**
5. Click **Continue**, then save the file as `CertificateSigningRequestPaymentProcessingCertificate.certSigningRequest` in your working directory.
6. When prompted for key pair settings, use:
* **Key Type**: Elliptic Curve (EC)
* **Key Size**: 256-bit
* **Algorithm**: ECDSA
## Step 3: Retrieve and convert the payment processing certificate
1. Go to the [Apple Developer Merchant ID list](https://developer.apple.com/account/resources/identifiers/list/merchant).
2. Select your Merchant ID and click **Create Certificate** under **Apple Pay Payment Processing Certificate**.
3. When prompted, answer **No** to "Will payments... be processed exclusively in China mainland?"
4. Upload the file `CertificateSigningRequestPaymentProcessingCertificate.certSigningRequest`.
5. Download the signed certificate as `apple_pay.cer` and save it to your directory.
6. Convert the certificate to PEM format:
```bash theme={null}
openssl x509 -inform DER -in apple_pay.cer -out apple_pay.pem
```
## Step 4: Export the private key
1. In **Keychain Access**, find the key you created (e.g., `John Doe ProcessingCertificate`).
2. Right-click and choose **Export**.
3. Export the key as a `.p12` file (e.g., `JohnDoeProcessingCertificate.p12`) and save it to your working directory.
4. Set a strong password (you’ll use it in the next step).
5. Convert the `.p12` to a PEM-format private key:
```bash theme={null}
openssl pkcs12 -in JohnDoeProcessingCertificate.p12 -nocerts -nodes | sed -ne '/-BEGIN PRIVATE KEY-/,/-END PRIVATE KEY-/p' > ProcessingCertificatePrivateKey.pem
```
The private key will be stored in `ProcessingCertificatePrivateKey.pem`.
## Step 5: Upload the certificate and key to Yuno
1. Open the [Yuno Dashboard](https://auth.y.uno/u/login) **> Connections > Apple Pay > Connect**
2. Enter the contents of `ProcessingCertificatePrivateKey.pem` to the **Payment processing key** field.
3. Enter the contents of `apple_pay.pem` into the **Payment processing certificate** field.
 ## Step 6: Generate a merchant identity certificate
1. Open **Keychain Access**, navigate to **Certificate Assistant > Request a Certificate From a Certificate Authority**, and enter:
* **Email Address**: your email
* **Common Name**: e.g., `John Doe MerchantIdentityCertificate`
* Leave **CA Email Address** blank
* Select **Saved to disk**
2. Save as `CertificateSigningRequestMerchantIdentityCertificate.certSigningRequest`.
## Step 7: Retrieve and convert the merchant identity certificate
1. Go to the [Apple Developer Merchant ID list](https://developer.apple.com/account/resources/identifiers/list/merchant).
2. Select your Merchant ID and click **Create Certificate** under **Apple Pay Merchant Identity Certificate**.
3. Upload the `CertificateSigningRequestMerchantIdentityCertificate.certSigningRequest` file.
4. Download the signed certificate as `merchant_id.cer` and save it.
5. Convert it to PEM:
```bash theme={null}
openssl x509 -inform DER -in merchant_id.cer -out merchant_id.pem
```
## Step 8: Export the merchant identity private key
1. In **Keychain Access**, find the certificate created in step 6, e.g. `John Doe MerchantIdentityCertificate`.
2. Right-click and export as `JohnDoeMerchantIdentityCertificate.p12`.
3. Set a strong password.
4. Convert the private key to PEM:
```bash theme={null}
openssl pkcs12 -in JohnDoeMerchantIdentityCertificate.p12 -nocerts -nodes | sed -ne '/-BEGIN PRIVATE KEY-/,/-END PRIVATE KEY-/p' > MerchantIdentityCertificatePrivateKey.pem
```
The private key will be available as `MerchantIdentityCertificatePrivateKey.pem`.
## Step 9: Upload the merchant identity certificate and key
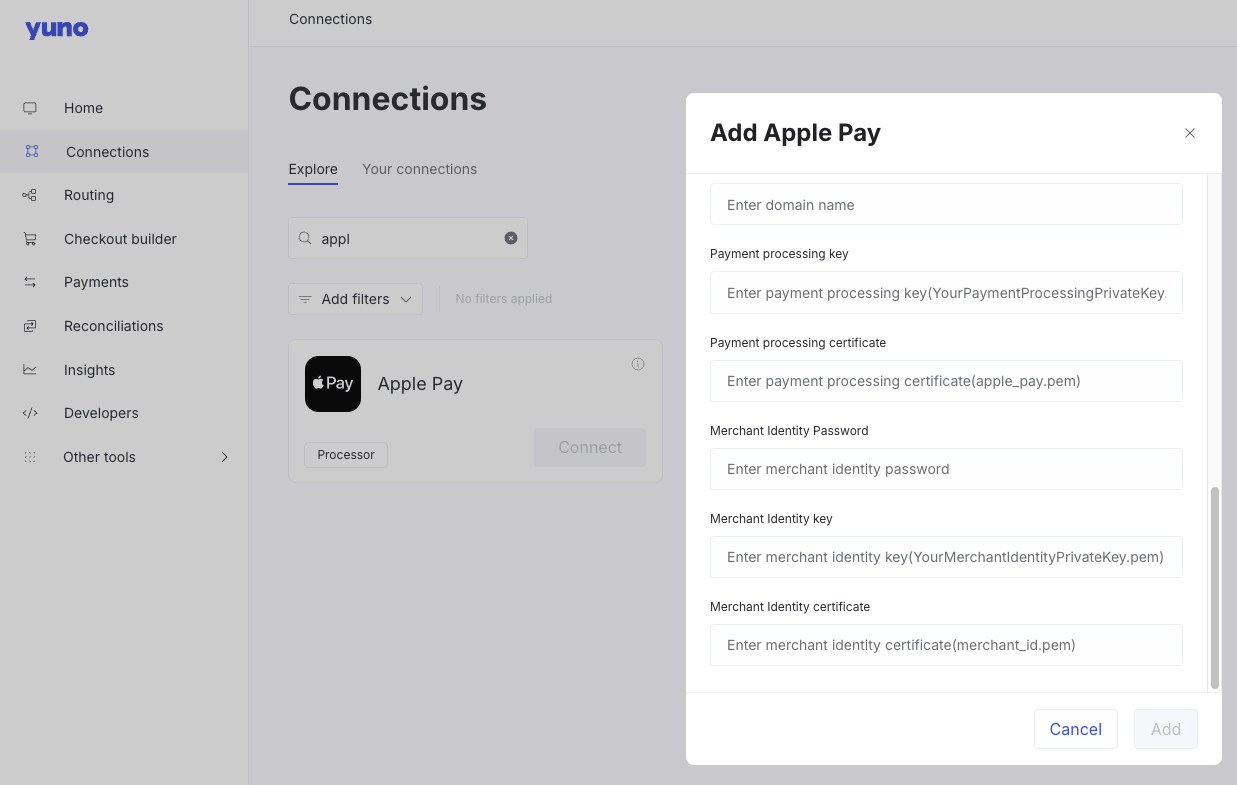
1. Return to your Apple Pay connection in the [Yuno Dashboard](https://auth.y.uno/u/login).
2. Copy the contents of `MerchantIdentityCertificatePrivateKey.pem` and paste them into the **Merchant Identity key** field.
3. Paste the contents of `merchant_id.pem` into the **Merchant Identity certificate** field.
## Step 6: Generate a merchant identity certificate
1. Open **Keychain Access**, navigate to **Certificate Assistant > Request a Certificate From a Certificate Authority**, and enter:
* **Email Address**: your email
* **Common Name**: e.g., `John Doe MerchantIdentityCertificate`
* Leave **CA Email Address** blank
* Select **Saved to disk**
2. Save as `CertificateSigningRequestMerchantIdentityCertificate.certSigningRequest`.
## Step 7: Retrieve and convert the merchant identity certificate
1. Go to the [Apple Developer Merchant ID list](https://developer.apple.com/account/resources/identifiers/list/merchant).
2. Select your Merchant ID and click **Create Certificate** under **Apple Pay Merchant Identity Certificate**.
3. Upload the `CertificateSigningRequestMerchantIdentityCertificate.certSigningRequest` file.
4. Download the signed certificate as `merchant_id.cer` and save it.
5. Convert it to PEM:
```bash theme={null}
openssl x509 -inform DER -in merchant_id.cer -out merchant_id.pem
```
## Step 8: Export the merchant identity private key
1. In **Keychain Access**, find the certificate created in step 6, e.g. `John Doe MerchantIdentityCertificate`.
2. Right-click and export as `JohnDoeMerchantIdentityCertificate.p12`.
3. Set a strong password.
4. Convert the private key to PEM:
```bash theme={null}
openssl pkcs12 -in JohnDoeMerchantIdentityCertificate.p12 -nocerts -nodes | sed -ne '/-BEGIN PRIVATE KEY-/,/-END PRIVATE KEY-/p' > MerchantIdentityCertificatePrivateKey.pem
```
The private key will be available as `MerchantIdentityCertificatePrivateKey.pem`.
## Step 9: Upload the merchant identity certificate and key
1. Return to your Apple Pay connection in the [Yuno Dashboard](https://auth.y.uno/u/login).
2. Copy the contents of `MerchantIdentityCertificatePrivateKey.pem` and paste them into the **Merchant Identity key** field.
3. Paste the contents of `merchant_id.pem` into the **Merchant Identity certificate** field.
 ## Step 10: Register your merchant domains
1. Go to [Apple Developer Merchant ID list](https://developer.apple.com/account/resources/identifiers/list/merchant).
2. Select your **Merchant ID** and click **Add Domain** under **Merchant Domains**.
3. Enter the domain (e.g., `demo.y.uno`) and click **Save**.
**Note**
You must also host Apple's `apple-developer-merchantid-domain-association` file at:
```
https://example.com/.well-known/apple-developer-merchantid-domain-association
```
Replace `example.com` with your actual domain name.
Once all steps are complete, you can proceed with the Dashboard setup.
## Step 11: Apple Pay Dashboard connection
1. Log in to your [Yuno Dashboard](https://dashboard.y.uno/connections).
2. Navigate to the **Connections** section.
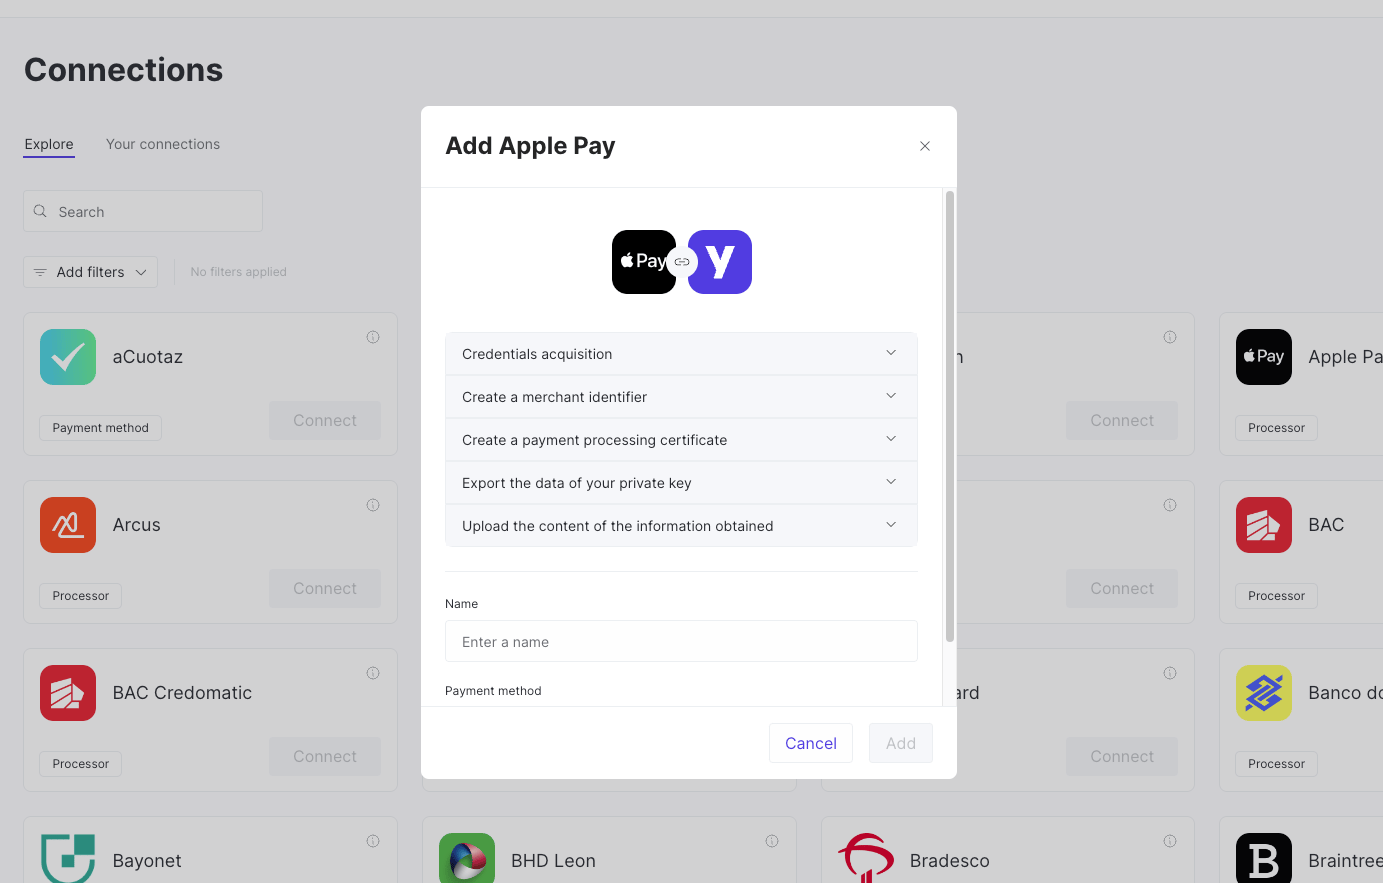
3. Locate and select the **Apple Pay** option and click **Connect**.
4. Provide a **Name** for the connection, select **Apple Pay** as **Payment method**, and provide the information you acquired when following the [Prerequisites](/docs/prerequisites-apple-pay) process, click **Next**.
5. Configure set up costs (optional) and accounts in the following two steps.
6. Click **Save**. Apple Pay will be added to your connections.
## Step 10: Register your merchant domains
1. Go to [Apple Developer Merchant ID list](https://developer.apple.com/account/resources/identifiers/list/merchant).
2. Select your **Merchant ID** and click **Add Domain** under **Merchant Domains**.
3. Enter the domain (e.g., `demo.y.uno`) and click **Save**.
**Note**
You must also host Apple's `apple-developer-merchantid-domain-association` file at:
```
https://example.com/.well-known/apple-developer-merchantid-domain-association
```
Replace `example.com` with your actual domain name.
Once all steps are complete, you can proceed with the Dashboard setup.
## Step 11: Apple Pay Dashboard connection
1. Log in to your [Yuno Dashboard](https://dashboard.y.uno/connections).
2. Navigate to the **Connections** section.
3. Locate and select the **Apple Pay** option and click **Connect**.
4. Provide a **Name** for the connection, select **Apple Pay** as **Payment method**, and provide the information you acquired when following the [Prerequisites](/docs/prerequisites-apple-pay) process, click **Next**.
5. Configure set up costs (optional) and accounts in the following two steps.
6. Click **Save**. Apple Pay will be added to your connections.
 ## Step 12: Configure Dashboard routing
Set up a new route to control how payments are processed through Apple Pay.
Visit the [Routing](/docs/routing) page for additional information on this step.
1. In the [Yuno Dashboard](https://dashboard.y.uno/), navigate to the **Routing** section.
2. Find the **Apple Pay** connection. If you have not created a route for Apple Pay yet, it will be on the **Not published** tab.
3. Set up a new route by pressing **Setup** on your **Apple Pay** module (or **View** if the route is published) and then clicking on **Create new route**. Give the connection a name and click **Save**.
4. Add conditions to specify how payments should be routed through Apple Pay.
5. Add Apple Pay as the payment processor for this route to ensure that payments meeting the defined conditions are processed through Apple Pay.
6. **Publish** the route once all configurations are defined.
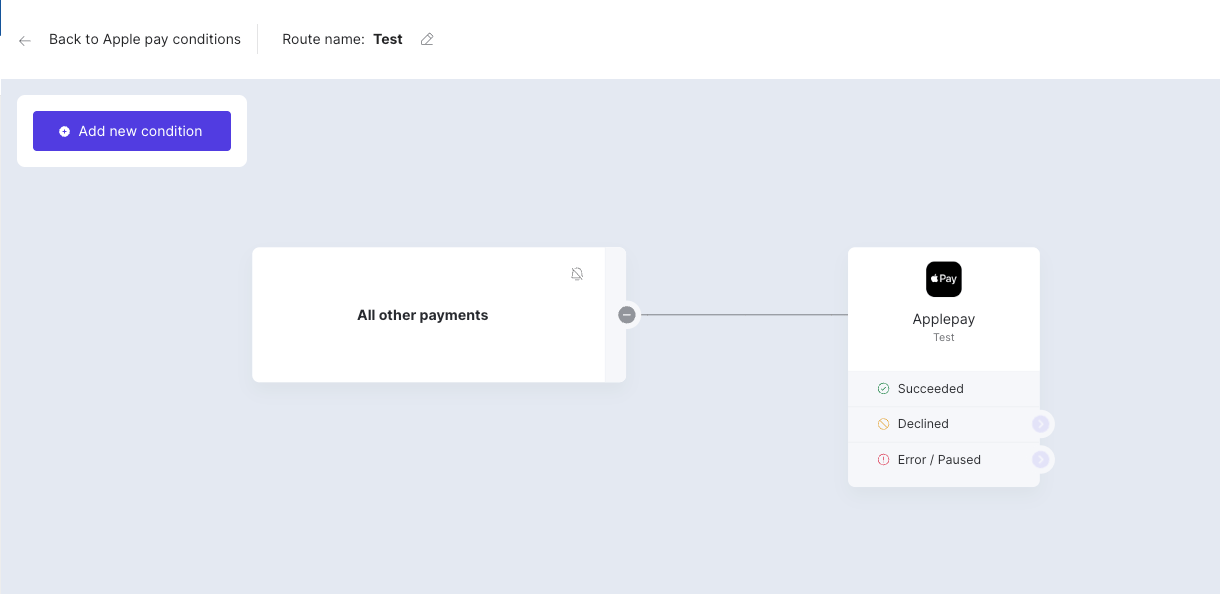
Here's a simple route processing all payments through Apple Pay.
## Step 12: Configure Dashboard routing
Set up a new route to control how payments are processed through Apple Pay.
Visit the [Routing](/docs/routing) page for additional information on this step.
1. In the [Yuno Dashboard](https://dashboard.y.uno/), navigate to the **Routing** section.
2. Find the **Apple Pay** connection. If you have not created a route for Apple Pay yet, it will be on the **Not published** tab.
3. Set up a new route by pressing **Setup** on your **Apple Pay** module (or **View** if the route is published) and then clicking on **Create new route**. Give the connection a name and click **Save**.
4. Add conditions to specify how payments should be routed through Apple Pay.
5. Add Apple Pay as the payment processor for this route to ensure that payments meeting the defined conditions are processed through Apple Pay.
6. **Publish** the route once all configurations are defined.
Here's a simple route processing all payments through Apple Pay.
 ## Step 13: Enable Apple Pay in Checkout Builder
Visit the [Checkout Builder](/docs/checkout-builder) page for additional information on this step.
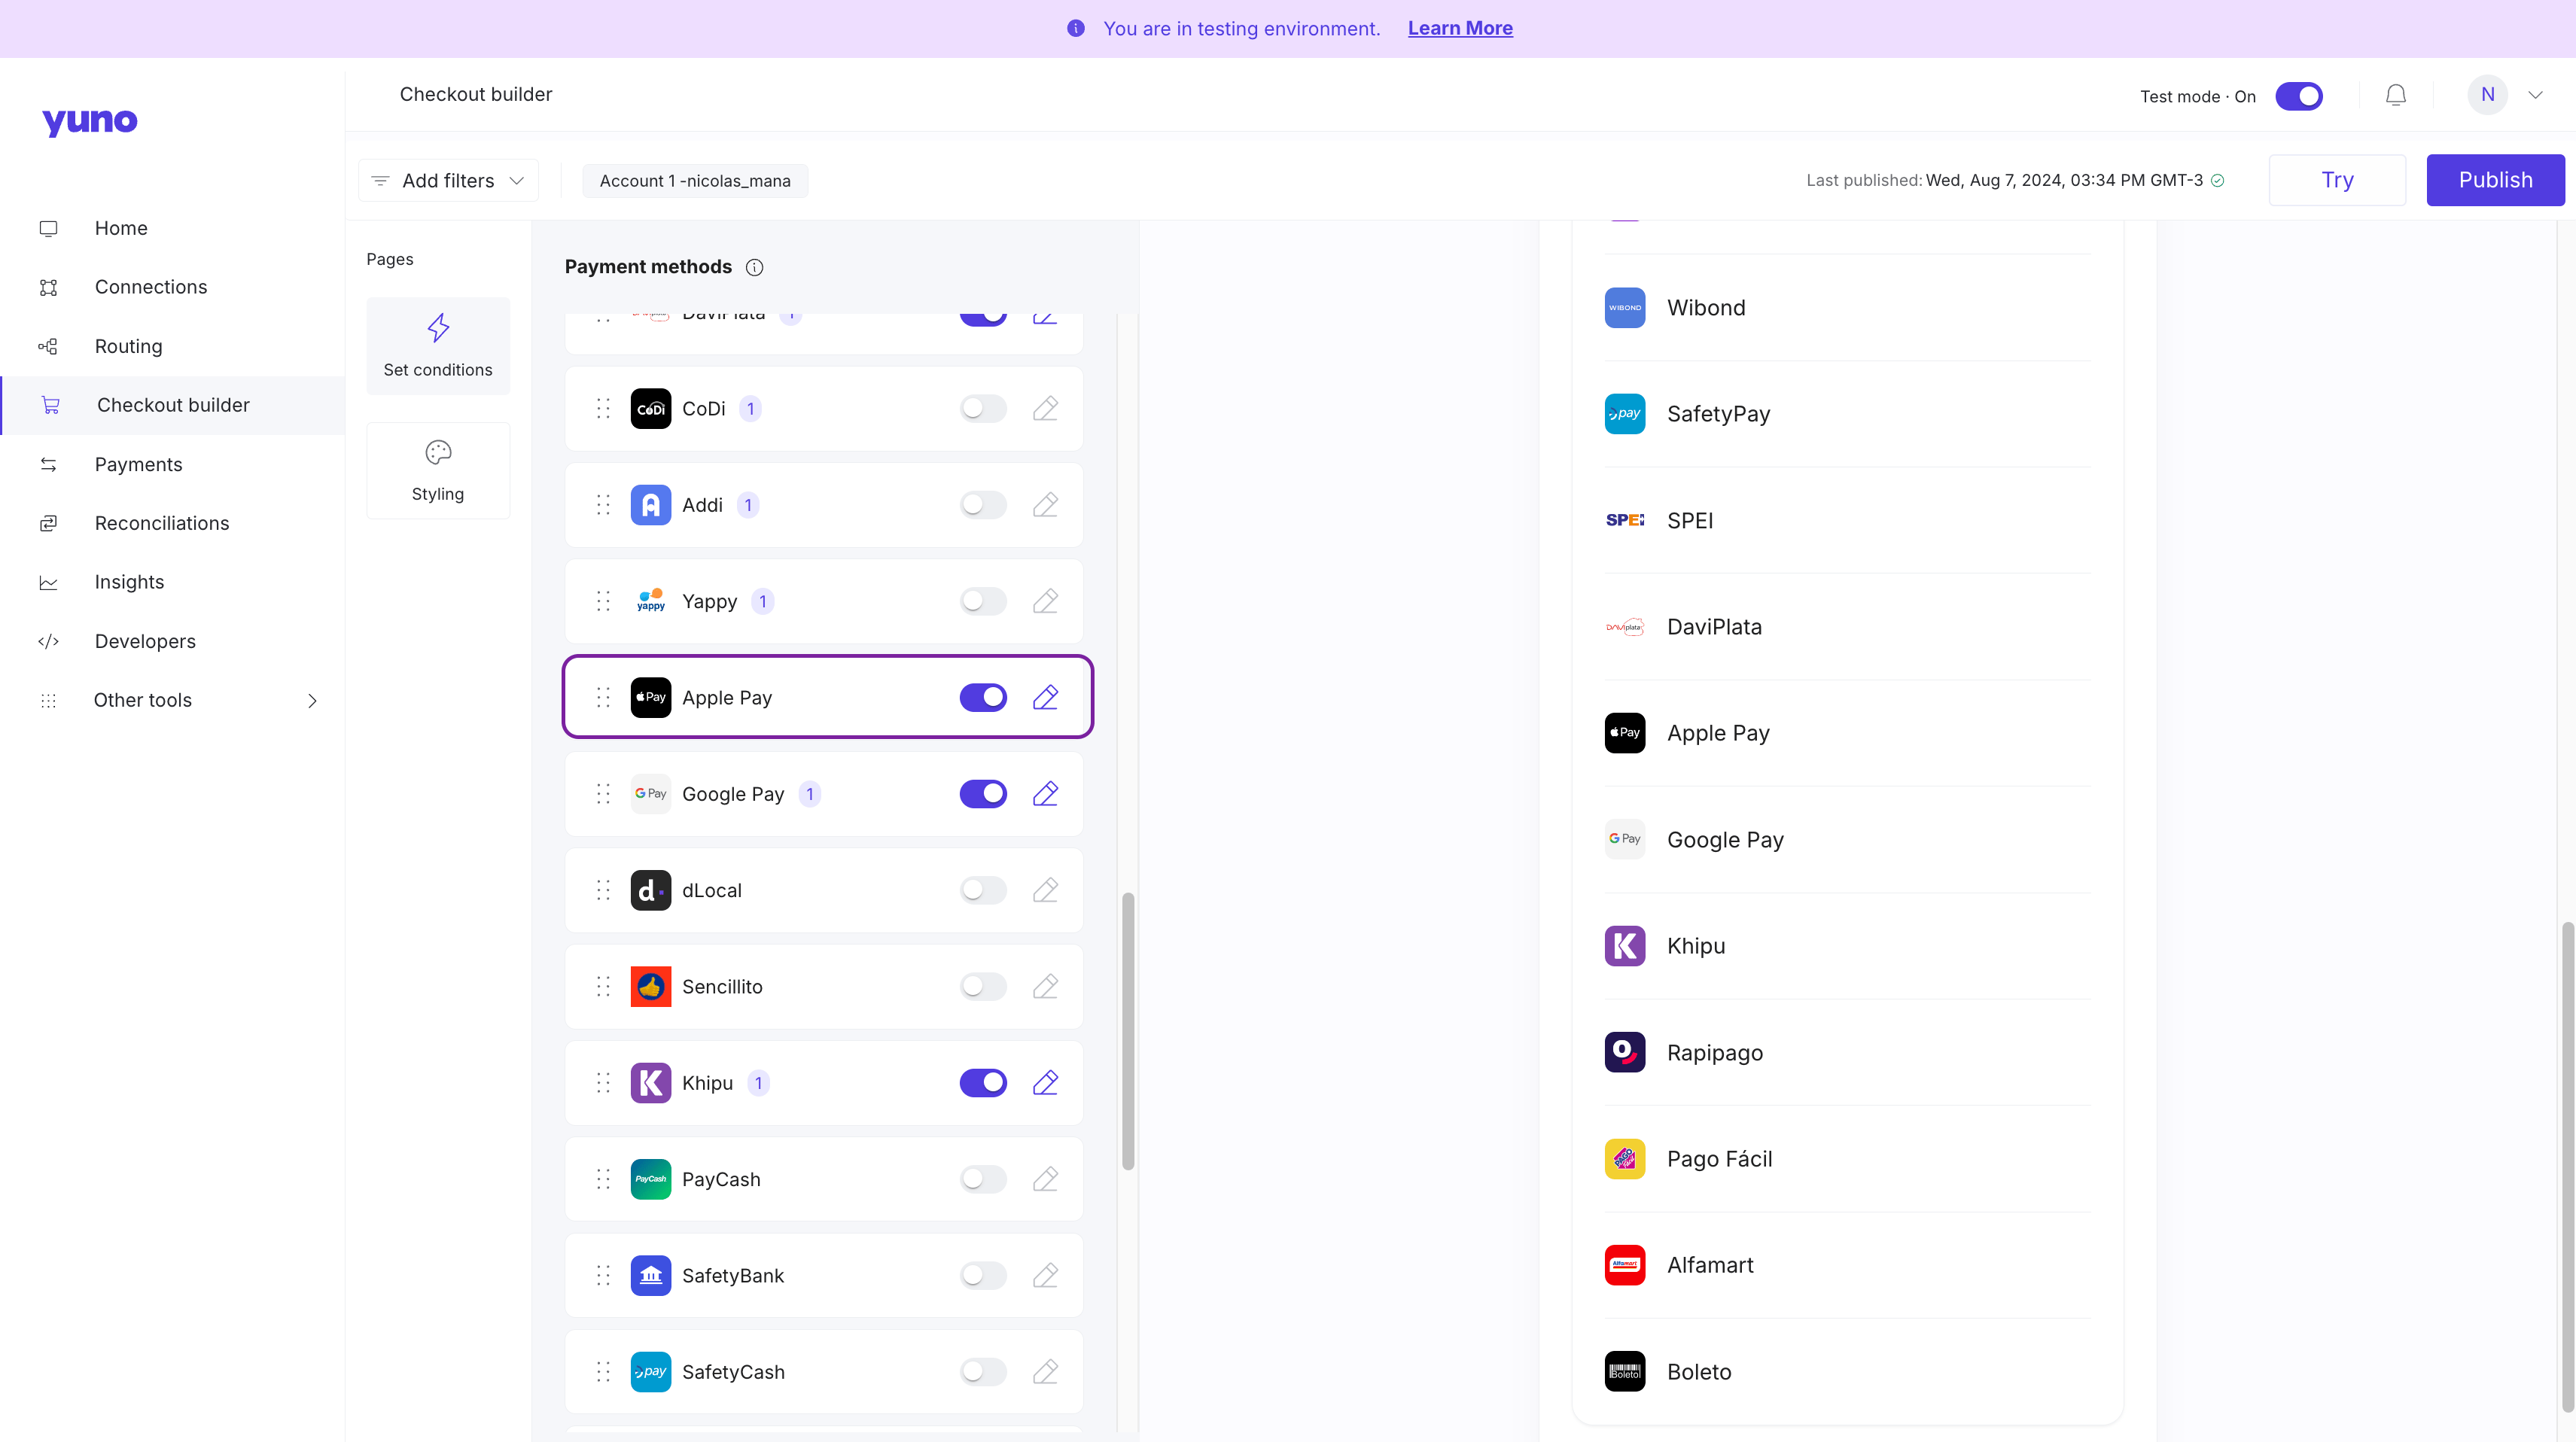
To make Apple Pay available to your end users, you have to enable it on the Checkout Builder:
1. In the [Yuno Dashboard](https://dashboard.y.uno/), navigate to the **Checkout Builder** section.
2. Locate the available **Payment methods** and enable **Apple Pay**. Click the three dots next to each method for additional options.
3. Click **Publish settings** to make Apple Pay available as a payment option for all transactions that meet the defined routing criteria.
## Step 13: Enable Apple Pay in Checkout Builder
Visit the [Checkout Builder](/docs/checkout-builder) page for additional information on this step.
To make Apple Pay available to your end users, you have to enable it on the Checkout Builder:
1. In the [Yuno Dashboard](https://dashboard.y.uno/), navigate to the **Checkout Builder** section.
2. Locate the available **Payment methods** and enable **Apple Pay**. Click the three dots next to each method for additional options.
3. Click **Publish settings** to make Apple Pay available as a payment option for all transactions that meet the defined routing criteria.
 If you plan to implement recurring payments, you will need to configure an additional URL in your Apple Pay connection where customers can manage their subscriptions (cancel, modify, etc.). This URL must be created and hosted by your merchant platform.
## Next steps
After completing the Dashboard setup, choose your path to integrate via SDK or Direct:
* **SDK Integration**: [one-time](/docs/apple-pay-sdk-integration#one-time-payments-with-sdk) and [recurring](/docs/apple-pay-sdk-integration#recurring-payments-with-sdk)
* **Direct integration**: [one-time](/docs/apple-pay-direct-integration#one-time-payments-with-direct-api) and [recurring](/docs/apple-pay-direct-integration#recurring-payments-with-direct-api)
If you plan to implement recurring payments, you will need to configure an additional URL in your Apple Pay connection where customers can manage their subscriptions (cancel, modify, etc.). This URL must be created and hosted by your merchant platform.
## Next steps
After completing the Dashboard setup, choose your path to integrate via SDK or Direct:
* **SDK Integration**: [one-time](/docs/apple-pay-sdk-integration#one-time-payments-with-sdk) and [recurring](/docs/apple-pay-sdk-integration#recurring-payments-with-sdk)
* **Direct integration**: [one-time](/docs/apple-pay-direct-integration#one-time-payments-with-direct-api) and [recurring](/docs/apple-pay-direct-integration#recurring-payments-with-direct-api)